We’re always here with 24/7 support because we care about your needs.
UPDATE September 19, 2017: Hardy OneNet now has two different types of TV set top boxes in circulation, which require two different remote controls. Below are handy guides that you can follow to see how to perform functions on your particular remote control. You also can download and print PDF versions of these guides.
Amino Remote Control Guide PDF download
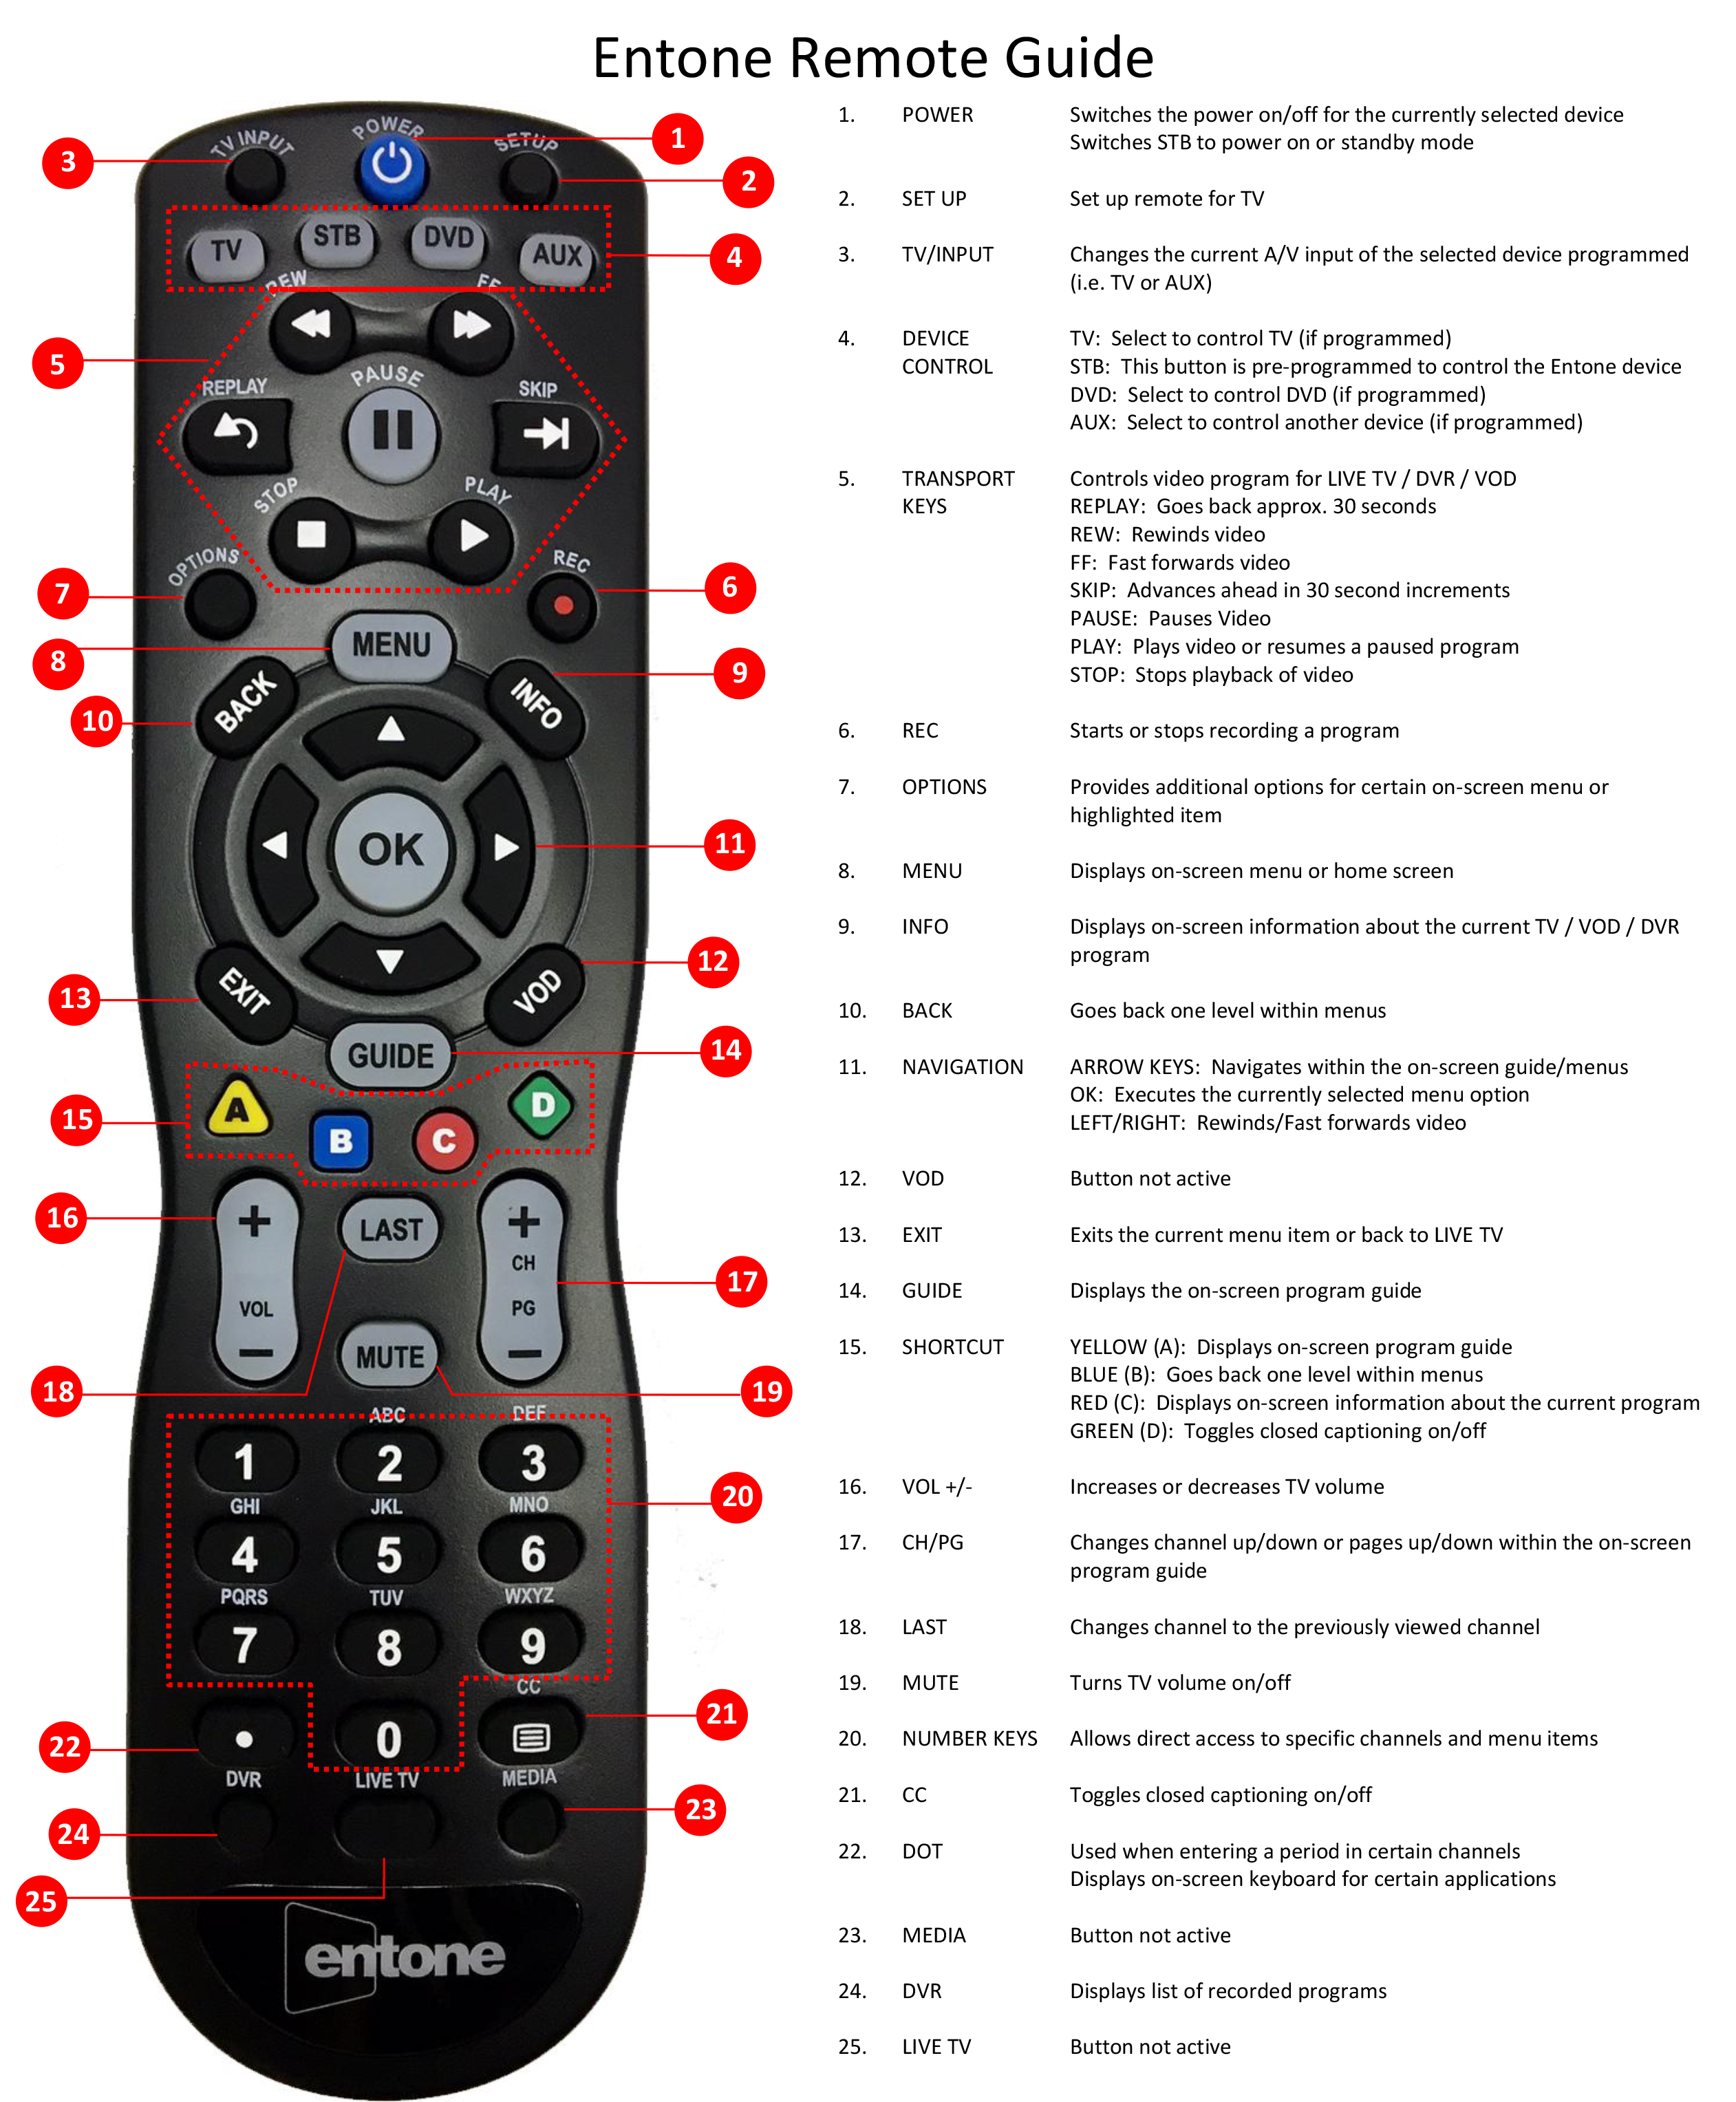
Entone Remote Control Guide PDF download

 UPDATE September 15, 2017:
Hardy OneNet recently upgraded its TV software features to enable one-button activation and deactivation of closed-captioning. You should be able to turn closed-captioning on and off simply by pressing the green button on your OneNet remote control. Closed-captioning still can be accessed through the Menu screen as described below in the instructional videos, but one-button activation should now be available using the green button on your remote control.
UPDATE July 21, 2017:
Hardy OneNet recently upgraded the software that runs our set top boxes and integrated different set top boxes into our service, so there might be slight differences between your specific user experience and the instructional videos and FAQs below.
The July 2017 enhancements include new Program Guide and Menu features, many of which were suggested by customers. Some of the new features include:
 The ability to view the next Restart program directly by pressing a button on the pop-up window displayed when the playback of the currently viewed program finishes. Previously, this required exiting entirely out of Restart and going back a second time in the Program Guide. This feature is especially helpful when programs run longer than intended, such as a sporting event.
- A new “Airings” button that displays a list of all future airings of a programs with the same Program Guide information on the same channel. This can now be found as a selection after pressing the Information button on a program’s listing in the Program Guide.
- A “Play Next” button that allows a customer to watch the next episode in a series of recordings. If you have multiple episodes of a series recorded, now you have the option of clicking a button to watch the next episode after the currently watched episode ends. Previously, you had to return to the DVR main menu and manually find the next episode.
- Series folders in your DVR menu. If you have multiple episodes of the same series recorded, these are now all located in a single folder with the series’ title, rather than all being listed individually.
- The ability to delete several DVR recordings at once. This managing capability allows you to check multiple recordings in the DVR menu, then delete them all at the same time. While in your list of DVR recordings, you can press the green button to “Manage” your recordings. Then you can check several recordings and delete them in one step. Deletion is the only available action at this phase.
- The ability to erase digits and enter new ones. When entering digits into the guide, it is possible to erase digits and enter new ones provided it is done quickly.
- A new DVR menu item to display the list of recordings automatically deleted, in order to facilitate the customer in deleting them to clear series lists.
- Expanded DVR menu sorting options: You can now view recorded programs or programs scheduled to record arranged by title, date, size, or channel.
These are only a few of the new and enhanced features now available with Hardy OneNet TV. We currently are working to expand OneNet’s Restart capabilities and will release more information when available. We hope you enjoy the new and improved Hardy OneNet TV!
OneNet
How do I program my OneNet remote control?
To avoid using multiple remotes, you can program your Hardy OneNet remote control to operate your television as well. First, make sure batteries are properly installed in the remote. Manually turn on your television. The OneNet set top box does not need to be turned on to perform this programming feature.
Amino Remote Auto Code Search: Press and hold the 1 and 3 buttons at the same time on the remote control for approximately three seconds, until the TV Power button remains lit. Then release both buttons.
Point the remote control at the TV set. Then press and hold down the Mute button on the remote control until your TV volume is muted. This process can take up to five minutes because the remote is searching for your particular brand of television.
Immediately press and hold the Text/Shift and Stop buttons simultaneously to finish setting up the TV control mode. The TV Power button light will go off.
Your OneNet remote control is now programmed to control your television.
Amino Remote Brand Codes: To program your Amino remote by entering the specific TV brand code, follow these steps:
1. Determine the manufacturer of your TV set.
2. Look up the 4-digit manufacturer code by clicking HERE, starting on page 9, and make a note of this code.
3. Make sure your TV set is turned on.
4. Press and hold both the 1 and the 3 buttons at the same time on the remote control for approximately 3 seconds until the TV standby button remains lit, then release both buttons.
5. Now enter the 4 digit manufacturer code for your TV set. On each digit entry the TV standby button will flash. On entry of the 4th digit the TV standby button will flash, then remain lit.
6. Point the remote control at the TV set and press and hold down the TV Standby Button or the Mute button on the remote control.
7. When the TV either turns off or brings up the MUTE symbol on screen, release that button. This may take a few minutes to happen.
8. Press and hold the Text/SHIFT button, and then at the same time press the STOP button to finish setting up the TV control mode. The TV standby button will go out. The TV control function is now programmed into the remote control.
UPDATE for Entone Remote: For the Entone Remote, please see the programming instructions on the back of the remote. They are: Press and Hold Setup button until LED light blinks twice. Press a Mode key (TV for television). Press and Hold OK key. Release OK key when device turns off.
What is DVR (Digital Video Recorder)?
DVR stands for digital video recorder. A DVR-capable set top box allows you to record TV programs, then replay them at a later time.
How do I record to DVR a show currently playing?
To record a show currently playing, press the record button on your OneNet remote control. A window will appear confirming that you want to record. Press OK and your program will begin recording from that point. The recording will automatically stop at the end of the scheduled program time. Please note that if you are recording a program that might run past its scheduled time block (for example, a sporting event that might go into overtime or a live awards show), you should manually set up your recording to allow for extra recording time. Otherwise the recording will stop at the end of the scheduled program time and the program itself might not be concluded.
How do I stop an ongoing DVR recording?
To manually stop an ongoing recording, press the Menu button on your OneNet remote control. Go to the My DVR icon and press OK. Highlight the Recorded icon and press OK. Go to the Recorded By Date icon and press OK. Find the program currently recording and press OK. Go to the Stop icon and press OK. Your recording will be stopped.
How do I schedule a future DVR recording?
To schedule a future recording for your DVR, you can use the program Guide or manually set the program to record. To use the program Guide, press the Guide button twice on your OneNet remote control to display the full Guide. Go to the program you want to record and press the Record button on your remote. You will be asked to confirm the recording. A recording icon will appear in the guide on the program you have set up to record.
To manually program a future recording, press the Menu button on your OneNet remote control. Go to the My DVR icon and press OK. Navigate to the Set Manual Recording icon and press OK. Select the channel you want to record. You can scroll through channels by continually pressing the OK button on your remote control. Enter the time you want to the recording to begin and to end. Enter the time by using the number keys on your OneNet remote control. Now you have to enter how often you want the program to record. You can scroll through the options by continually pressing OK on your remote control. Enter the date that you want the program to record. Go to the Set box and press OK. Your DVR is now programmed to record according to the schedule you entered.
How do I watch a DVR recording?
To watch a show you’ve previously recorded on your DVR, press Menu on your OneNet remote control. Go to the My DVR icon and press OK. Navigate to the Recorded box. There you can sort by date and time through all recorded programs on your DVR. Highlight the program you want to watch and press OK. Then select Start.
How do I delete a DVR recording?
To delete a recording from your DVR, press Menu on your OneNet remote control. Go to the My DVR icon and press OK. Navigate to the Recorded box and press OK. Choose whether to display the Recorded programs by date or by title. Highlight the program you want to delete and select OK. Select the Remove box and press OK. Confirm you want to delete the recorded program by highlighting OK on the TV screen and then pressing OK on the remote control.
What is the OneNet Program Guide?
The Program Guide lists the different OneNet TV channels on your television screen and offers program descriptions. It can be customized to suit your preferences.
How do I navigate the Program Guide?
The Guide can be navigated in several different ways. The Guide is accessed by pressing the Guide button in the center of the remote one time. Depending on what version of our set top box software you have, you might need to press the Guide button twice because the Mini-Guide appears with one press. Do not press the Guide more than once if the full Program Guide appears after one press.
In most cases, the arrow buttons surrounding the OK button in the center of the remote will move one listing either up, down, forward or backward in the Guide.
You also can jump forward or backward a day (24 hours) at a time by pressing the rewind and fast-forward (double arrow) buttons near the top left and right of the remote. The chapter reverse or forward buttons (the buttons depicting an arrow and a line right below the rewind and fast-forward buttons) will move you forward or backward one screen at a time in the Guide, usually a period of 1.5 hours at a time.
Also, the single up and down arrow buttons below the Guide button in the center of the remote (between the volume and channel buttons) will allow you to move up and down in the Guide a full screen at a time.
Word of caution: Do not hold any of the buttons down or press them repeatedly. If you hold the buttons down, the set top box will register that as continual separate presses (you can see this by the green light blinking repeatedly on the set top box). Each blink on the set top box is another press that must be completed before the Guide navigation will stop, even if you let up on the button. The result is that the Guide may go past the point you’re looking for ever though the button is no longer pressed. We are waiting for an update to our set top box software that should result in faster Guide performance, but that version isn’t ready yet.
What is the “My Channels” option on the Program Guide?
The My Channels guide shows only the channels included in your Hardy OneNet TV subscription, so you will not see any channels that you don’t receive. To set up your program guide to display My Channels, press the Guide button repeatedly on your OneNet remote control until “My Channels” is listed under the current program box.
What is the “Favorite Channels” option on the Program Guide?
The Favorite Channels guide allows you to create your own guide that displays only channels you select. To set up your program guide to display Favorite Channels guide, press the Guide button repeatedly on your OneNet remote control until “Favorite Channels” is listed under the current program box.
How do I add and remove “Favorite Channels” on the Program Guide?
To add a channel to your Favorite Channels Guide, go to the channel that you wish to add. Press the red button on your OneNet remote control. The “Add to Favorites” box will automatically be selected. Press the OK button and a confirmation box will appear saying that channel has been added to the favorite channels list. Press OK. The channel will now appear in your Favorite Channels guide.
To remove a channel from your Favorite Channels Guide, go to the channel that you wish to remove. Press the red button on your OneNet remote control. The “Remove from Favorites” box will automatically be selected. Press the OK button and a confirmation box will appear saying that channel has been removed from the favorite channels list. Press OK. The channel will no longer appear in your Favorite Channels Guide.
What is the “Offered Channels” option on the Program Guide?
The Offered Channels guide shows all of the channels that are available through Hardy OneNet, regardless of whether you are currently subscribed to all of those channels. To set your program guide to display Offered Channels, press the Guide button repeatedly on your OneNet remote control until “Offered Channels” is listed under the current program box.
What is the Mini-Guide?
The Mini-Guide provides specific information about a program, such as the date and time of the program, a status bar indicating how far the program has progressed, and a basic description of the current program. The Mini-Guide will be the first screen to appear when you press the left or right arrow button on your OneNet remote control during normal viewing. To remove it from the screen, press the X button, or press the Guide button to access the other Program Guide screens.
How do I turn the Mini-Guide on and off?
You can turn the Mini-Guide on and off. To turn the Mini-Guide on or off, press the Menu button on your OneNet remote control. Go to the Settings icon and press the OK button. Navigate to the Preferences icon and press OK. Go to the Appearance icon and press OK. In the Appearance menu, use the arrows to navigate down to the box to the right of “MiniEPG.” Once the arrow in the box is yellow, press the OK button on your remote control. When the box says No, the Mini-Guide is disabled and will not appear on your screen. When the box says Yes, the Mini-Guide is enabled and will appear on your screen. Once you’ve made your desired selection, go to the Apply box and press OK. This will save any changes you’ve made. To exit out of the Settings menu, press the X button on your remote.
How do I browse programming in the Mini-Guide?
While in the Mini-Guide, use the round arrow navigation buttons surrounding the OK button in the center of the remote to browse future programming of that channel. You also can browse past programming if you subscribe to OneNet’s Restart TV feature. The up and down buttons allow you to navigate through different channels.
How do I pause and rewind live TV with a DVR?
DVR gives you the capability to pause live TV and rewind live TV to the beginning of that program’s scheduled time block on the Program Guide, only if you have not changed the channel since the beginning of the program’s scheduled time block. Press the Pause button on your OneNet remote control to pause live TV. Press the Rewind button on your OneNet remote control to rewind live TV to the beginning of that program’s scheduled time block. If you have changed the channel since the beginning of a current program’s schedule time block, you are able to rewind live TV only to the point the channel was changed.
What is the Settings Menu?
In the Settings menu, you can establish multiple user accounts, control what type of program content is allowed, and search for programs.
What are User Accounts?
Your Hardy OneNet TV service allows you to have multiple user accounts, allowing the primary user to control access to program content or restrict purchasing of paid programs. For example, parents might establish a separate user account for children.
How do I add a new User account?
To add a new user, press the Menu button on your OneNet remote control. Go to the Settings icon and press the OK button. Navigate to the Account icon and press OK. Go to the Manage Users icon and press OK. Navigate to the Create New box and press OK. Go to the ABC box and press OK. Use the ABC box to enter the desired Username with a maximum of 11 characters and a Password with a maximum of 6 digits. Re-enter the password in the box to the left of Confirm. In the box to the right of Rating, select the highest rating you want that user to be able to view. You can scroll through the rating options by repeatedly pressing the OK button on the remote. In the next box you can set the Spending Limit of that user. Navigate down to the box to the right of Spending Limit so that it is highlighted. Now enter the desired spending limit amount and press OK. Next enter whether the new User can or cannot subscribe to other programming or features. Scroll through the Can Subscribe and Cannot Subscribe choices by repeatedly pressing the OK button on the remote. Go to the Apply box and press OK. Please note that if you give a User account the ability to subscribe, that user will set his/her own Purchase PIN for that account and be able to subscribe and purchase programming without needing the Primary User’s Purchase PIN. If you have any concern about a new User Account purchasing programming, we recommend that you choose Cannot Subscribe for that account.
The new User account is now set up, but you must enable the account to receive channels. Highlight the new User account name and press OK on your remote. On the User Actions screen, go to the Avail. Sub. icon and press OK. Your new User should be able to subscribe for Free to any channel tier already purchased. The channel tiers must be added in progressive order: Silver, Gold, Platinum. For example, if you want the new User to receive the Platinum tier channels, you first must Activate the Silver and Gold tiers for that User. To allow the new User to receive Platinum tier channels, go to the Silver icon and press OK. Highlight Activate and press OK. Enter the primary User’s PIN, highlight Activate and press OK. Repeat the Activation steps to add the Gold and Platinum channel tiers. The new User will now be able to log in and access the Platinum tier channels with any predetermined Ratings limits that you assigned. Press the X button on your remote to exit back to regular TV viewing.
How do I edit the settings of an existing User account?
To edit the settings of an existing user, press the Menu button on your OneNet remote control. Go to the Settings icon and press the OK button. Navigate to the Account icon and press OK. Go to the Manage Users icon and press OK. Navigate to the user account you want and press OK. Select the Modify box. Modify the settings as you wish. To change the Username or Spending Limit, use the Back button on your remote to erase the current entry. Press OK when finished.
How do I log in or out of a particular User account?
You can sign in or out of a particular User account. To log in to a User account, press the Menu button on your OneNet remote control. Enter your Username and Password and press OK. You will be signed in with the restrictions assigned to that User account, such as Rating and Spending Limit.
To log out of a User account, press the Menu button on your OneNet remote control. Go to the Logout icon and press OK. You will be logged out of any User account.
What is a Purchase PIN?
A Purchase PIN, or Personal Identification Number, is a security feature that allows the User to block purchases of paid programming or features unless a four-digit number is entered. Any attempts to purchase OneNet Video on Demand or other paid programming will require entry of the PIN. The Purchase PIN will block paid programming regardless of rating. The Purchase PIN also allows users to subscribe to the OneNet Weather App and Restart TV. Please note that a Purchase PIN applies only to a specific User account. If a separate User account has the ability to subscribe to programming, that User will set up his/her own Purchase PIN.
How do I set or change a Purchase PIN?
To set or change your Purchase PIN, press the Menu button on your OneNet remote control. Go to the Settings icon and press OK. Navigate to the Account icon and press OK. Go to the Purchase PIN icon and press OK. Enter a four-digit number. Re-enter the four-digit number for confirmation and then enter the Primary User’s password. Go to the Apply box and press OK.
What is a Ratings PIN?
Ratings controls are a parental control feature that allows the Primary User to block programs based on content rating. Ratings controls can be set for each individual User account as described in the Add or Edit User Settings directions, or applied as a general rule with the Rating PIN. With the Rating PIN, users must enter a four-digit number to access programming with content ratings above the predetermined rating.
How do I set up a Ratings PIN?
To set or change the Rating PIN, press the Menu button on your OneNet remote control. Go to the Settings icon and press OK. Navigate to the Account icon and press OK. Go to the Rating PIN icon and press OK. Enter a four-digit number. Re-enter the four-digit number for confirmation and then enter the Primary User’s password. In the box to the right of Enable PIN Protected Rating, choose Yes to enable the PIN Protected Rating or NO to disable the PIN Protected Rating. You can scroll through the Yes and No options by repeatedly pressing the OK button on the remote. If you enable the PIN Protected Rating, you then must choose a Rating level. In the box to the right of PIN Protected Rating, you can scroll through the different rating options by repeatedly pressing OK on the remote. Once you have chosen a Rating level, go the Apply box and press OK. Programming rated above the Rating level you entered will now be blocked unless the four-digit PIN you specified is entered.
You also can establish ratings protection when setting up a new user, or you can modify the settings of an existing user to include ratings protection. Please see the entries for “How do I add a new User account?” and “How do I edit the settings of an existing User account?”
What are the different ratings for movies and TV programs?
Motion pictures and TV shows employ voluntarily ratings systems to assist parents in determining whether programs are suitable for viewing by children. Theatrical movies typically are rated G, PG, PG-13, R, or NC-17. A G rating means the movie is suitable for viewing for all general audiences. A PG rating means that parental guidance is suggested for younger viewers, as some material may not be suitable. A PG-13 rating means that parents are strongly cautioned, and the movie contains material that might not be suitable for children younger than 13. An R rating means that the movie contains objectionable content and is suitable for restricted audiences – in theaters, viewers younger than 17 years old are not admitted without an adult parent or guardian. An NC-17 rating means the movie contains strong adult content – in theaters, no viewers younger than 18 years old are admitted.
TV shows employ a different ratings system, instead using the ratings TV-Y, TV-Y7, TV-Y7(FV), TV-G, TV-PG, TV-14, and TV-MA. The TV-Y, TV-Y7 and TZV-Y7(FV) ratings are usually used for children’s programming. A TV-Y rating means the program is suitable for all children. A TV-Y7 rating means the program is directed toward children at least 7 years old. A TV-Y7(FV) rating means the program contains fantasy violence and is directed toward children at least 7 years old. The TV-G, TV-PG, TV-14 and TV-MA ratings are usually used for non-children’s programming. A TV-G rating means the program is suitable for all audiences. A TV-PG rating means parental guidance is suggested for younger viewers. A TV-14 rating means parents are strongly cautioned and some material may be inappropriate for viewers younger than 14. A TV-MA rating means the program is suitable for mature audiences only.
How do I change my package subscription?
To change your package subscription, please contact one of our offices. You can reach us at 304-530-5000 in Moorefield or 304-897-9911 in Lost River.
How do I add a premium service like HBO or Showtime?
To add a premium package such as HBO, Starz, or Showtime to your subscription, please contact one of our offices. You can reach us at 304-530-5000 in Moorefield or 304-897-9911 in Lost River.
What is the Hardy OneNet Weather App?
The Hardy OneNet Weather App is a free feature that allows you to view pre-determined local, regional and national weather conditions and forecasts. Choose from areas within Hardy county as well as surrounding areas such as Harrisonburg, Virginia, and Winchester, Virginia. The Weather App should already be activated and accessible. However, if the app has not been activated, you need to subscribe to this free app in order to access it.
How do I subscribe to the Hardy OneNet Weather App?
To subscribe to the Hardy OneNet Weather App, press the Menu button on your OneNet remote control. Go to the Settings icon and press OK on your remote. Navigate to the Account icon and press OK. Go to the Available Subscriptions icon and press OK. Navigate to the Other Services icon and press OK. Go to the Weather icon and press OK. Enter the Primary User’s four-digit PIN. Go to the Buy icon and press OK. You will now be subscribed to the OneNet Weather App.
How do I view the Hardy OneNet Weather App?
To view the Hardy OneNet Weather App, press the Menu button on your OneNet remote control. Go to the Weather icon and press OK.
To view the weather information for select locations in Hardy County, navigate to the Hardy County icon and press OK. Use the left and right arrows to scroll through the weather location options.
To view the weather information for select locations in surrounding areas, navigate to the Surrounding Areas icon and press OK. Use the left and right arrows to scroll through the weather location options.
To view the weather information for select cities across the United States, navigate to the US icon and press OK. Use the left and right arrows to scroll through the weather location options.
How do I reboot my OneNet DVR Set Top Box?
To reboot your OneNet DVR Set Top Box, simply disconnect the electrical power to the box, wait 30 seconds, then reconnect the electrical power to the box. The box will reboot.
How do I reboot my OneNet Non-DVR Set Top Box?
To reboot your OneNet Non-DVR Set Top Box, simply disconnect the electrical power to the box, wait 30 seconds, then reconnect the electrical power to the box. The box will reboot.
How do I enable and disable Closed Captioning on OneNet?
UPDATE: As of September 2017, one-button activation is active for Closed Captioning. Simply press the Green button your OneNet remote control to turn closed captioning on and off. The method described below still works as well.
To enable or disable Closed Captioning on OneNet, press the Menu button on your OneNet remote control. Go to the Settings icon and press OK. Navigate to the Preferences icon and press OK. Go to the Set-top-box Setup icon and press OK. Navigate to the Closed Caption box and highlight your preference of either On or Off. Go to the Apply button and press OK. Your OneNet set top box should now display or not display Closed Captioning according to your preference.
How do I change the Audio/Video Input on my television with the OneNet remote?
To change the Audio/Video Input on your television set with the OneNet remote control, simply press the AV button in the top center of the remote. Pressing the AV button should cycle your television set through its specific Audio/Video inputs.
(Please note that the type and number of Audio/Video inputs can vary by television brand, make and model. The OneNet remote control’s AV button might not work with all television sets – in that case, you must use the correct button on your television remote or on your television set itself to change the Audio/Video input. These will vary by television brand, make and model.)
How do I configure my OneNet set top box for High-Definition output with an HDMI cable to my television?
To get the best quality High-Definition picture with OneNet, your set top box should be connected by an HDMI cable to your HD television. If you are using an HDMI cable, you should make sure that your OneNet set top box is configured for HD output to the TV. To configure your OneNet set top box for High-Definition output to work with an HDMI cable connected to your television, press Menu on your OneNet remote control. Navigate down to Settings and press OK. Highlight the Preferences option and press OK. Navigate down to the Set-top-box Setup option and press OK. Use the down arrow to highlight the Component Output option. Press OK on the up or down arrow until “HD” appears in the box. Navigate down until the Apply button is highlighted. Press OK.
Your OneNet set top box will then reboot (if a DVR box, you will be asked to log back in). Your set top box is now configured for High-Definition output.
Telephone
Do I need a filter between my broadband modem and the phone jack?
No. Filters are used to remove the broadband signal for voice calls only. Filtering your broadband line will interfere with your connection.
I don’t have a dial tone on my telephone line.
Use a corded telephone to test for dial tone. Corded telephones receive their power from the telephone circuit. Other electrical issues may be present with cordless phones that might prevent you from hearing a dial tone.
Make sure all connections between the telephone base and the handset are secure as well as the connection from the telephone base to the wall jack.
To determine if the connection problem is within the house, open the telephone box on the outside of your house and plug in a corded telephone and check for dial tone. If you have dial tone at this point, the connection problem is somewhere within your home.
I have noise on my line. What can I do to determine what the problem is?
If you have another phone or fax machine in the house, check it to see if the problem exists on it as well.
Unplug all of the phone connections in the house and then plug them in one by one to see which phone or connection is causing the problem. Do not forget fax machines, satellite receivers, computer modems, and other devices connected to the phone line as these can also be the source of a problem.
How do I troubleshoot telephone service problems on my own before calling Hardy?
Telephone Service Problems
1. Determine if it is one phone or all of your phones that do not work.
2. If the problem is with more than one phone, unplug all phones and test them one at a time.
3. If the problem is only with one phone, test that phone in another jack. If it still does not work, that phone is probably bad.
4. If the phone works in a different jack, go back to the jack where the trouble started and test it with a different phone. If neither phone works, there may be a problem with the wiring to that particular jack.
5. If none of the phones work after testing each phone and jack separately, please contact Hardy’s customer service department at (304) 897-9911 or (304) 530-5000 to report a trouble.
How do I apply for Phone Service?
Hardy Telecommunications is a Cooperative and as such a membership application must be completed and signed by the applicant. Memberships are extended to individual persons. For more information, please see our Bylaws.
I have a private number. How do I send my number when I make a call?
The “Call Send” feature allows you to dial a code which will allow your phone number to be sent to the party you are calling on a particular phone call.
Press *82.
Listen for the three beeps and a steady dial tone.
Make your call.
What can I do about harassing phone calls?
Immediately after receiving an offensive call hang up, pick the phone, listen for dial tone and dial *57. You will receive notification of a successful trace. Call 304-897-9911 immediately with the time of the trace. If after-hours or over the weekend, you may report the trace the next business day. Any recorded information will be sent to the Prosecuting Attorney’s office.
What is subscriber line charge on my statement?
The Federal Communications Commission (FCC) requires that local telephone companies recover a portion of the costs of the facilities we use to connect your home or business through a monthly assessment on all residential and business customers. The federal “subscriber line charge” (SLC) assessment is part of the FCC’s effort to promote a competitive framework for the telecommunications industry. The federal SLC is a flat monthly charge assessed directly on your bill. The SLC does not result in any additional revenue for local telephone companies.
What is your billing cycle?
Local telephone service is billed for the current month in advance — and is usually due within 10–15 days of receipt. Charges for usage, on the other hand, are billed after a particular service is used; e.g., local measured service, long-distance calls, calling-card, etc.
Do I need my bill stub to pay my bill?
It is not required but highly recommended to bring your bill stub when paying your bill.
Why is my first bill so high?
Typically the first bill is for a partial and full month of service, and contains installation fees.
On my bill I see CLEC and/or ILEC, what does that mean?
These terms designate our service areas for internal Hardy Telecommunications purposes.
CLEC – Competitive Local Exchange Carrier
ILEC – Incumbent Local Exchange Carrier
My service has been terminated for non-payment, how do I re-establish service?
Your total bill must be paid in full before your telephone service is reconnected. If your bill has a past due balance that you cannot pay, you may be able to make arrangements to pay the past due amount in installments before your service is disconnected. Please contact the business office for further details.
Can I make any calls when my service is in disconnect status?
Any calls to 911 or Hardy Telecommunications (304-897-9911 or 304-530-5000) can still be placed.
When I receive a late notice, does this include Internet service?
No, a final notice does not include amounts due for your Internet service. Even after paying your final notice balance, your Internet could still be disconnected if it is also past due.
How can I pay my HardyNet or phone bill?
We have two business offices, one at 121 South Main Street in Moorefield and one at 2255 Kimseys Run Road in Lost River, where you can pay your bill by cash, check, money order or credit card (MasterCard or Visa only). Both of our offices are also equipped with a drop box in the parking lot for after-hours accessibility. For your convenience, Hardy accepts various other forms of payment including online or automatic MasterCard or Visa and/or bank drafts from any checking or savings account – for online payments, you must first be registered to use our Customer E-Care service, which is accessible on our homepage.
What if I have a question about my AT&T long distance charges on my bill?
You should contact AT&T customer service directly. AT&T’s website can be found at www.att.com.
How do I make a call to a correctional facility (correctional calling)?
You must dial AT&T at 1-800-844-6591. You will be asked to prepay in order to do correctional calling. Correctional calling is not handled by Hardy Telecommunications, Inc.
What is Hardy Voice Connect?
Hardy Voice Connect is our new voice mail system, made possible by the installation of a new softswitch in our central office. Voice Connect allows you to receive messages while you are on the phone with another caller or unable to answer the phone, ensuring that you won’t miss an important message. Voice Connect lets you access messages from any location and provides you with the date and time of the call. You also can keep track of your voice mail messages online. You can configure your system so that you are alerted by email whenever a caller leaves a voice mail at your number. You can then log into the Voice Connect system via our website and listen to your voice mail message over the Internet. Voice Connect works with multiple phones, so that you can have a call to your home number also ring a work phone and mobile phone, either simultaneously or one after another. You’re never out of touch with Hardy Voice Connect!
The Voice Connect system will soon allow you to purchase and manage various Hardy calling features via the Internet, and have the services become active immediately on your telephone. Purchase what you like, then manage them online.
How do I check my voice mail messages on the Hardy Voice Connect voice mail system?
If calling from your home phone, dial *99, or dial 304-897-9922. The voice mail system will then prompt you for your pass code.
Internet
How do I reset or set up my broadband modem?
If you need to reset your connection, we highly recommend rebooting all of your equipment. Shut down your computer and unplug the power from your broadband modem and router (if you have one). Leave everything off for at least 60 seconds. Plug your modem in first and allow it to re-establish its connection – at least 60 seconds. Secondly plug in your router and allow it to re-establish its connection – at least 60 seconds. Turn on your computer.
Often this procedure is needed after power outages or “brown outs.” We recommend the use of a battery backup or UPS to prevent this from occurring. These are available for purchase at our Moorefield office.
How do I hook up my broadband router?
The direct line from your telephone jack should be connected to the LINE port on your broadband modem. A network cable should run from the broadband modem to the router. For a wireless connection, no other connecting cables are necessary; your computer should be able to pick up your wireless network signal. For a wired connection, a second network cable should run from the router port to the network plug on the computer.
Will my computer access the Internet wirelessly?
Your computer should access the Internet wirelessly if your computer is equipped with a wireless network card and you have access to a wireless network connection. A wireless broadband router can be used to establish a wireless network connection through your broadband modem. Routers are available for purchase at our Moorefield office.
How do I make my Broadband connection wireless?
HardyNet’s Personal Computer Sales store offers wireless routers for purchase with configuration included. For more information please call 304-530-PC4U.
Do I need a filter between my broadband modem and the phone jack?
No. Filters are used to remove the broadband signal for voice calls only. Filtering your broadband line will interfere with your connection.
Why can I not connect, only connect at a slow speed, or cannot stay connected?
If you get disconnected frequently, check for one of these possible problems:
DSL CUSTOMERS
If you are having problems getting connected or staying connected, check the phone jack that your DSL modem is using for dial tone and any noise. Plug a corded phone into the jack and make a call; if no problems are found, then hook the DSL modem back up and plug the corded phone into the phone port in the back of the DSL modem and make a call. Listen for any noise (such as frying, cracking, or clicking) on the line. Be sure to stay on the line for several minutes as some noises can be intermittent.
If the line is clear, you may also temporarily remove any piece of equipment between the DSL modem and the wall jack (such as splitters or surge protectors). These devices may have gone bad or have taken an electrical surge and are preventing your connection. It is also important that filters be placed on all phone jacks in the house (phones, satellite TV’s, fax machines, etc.), except for the DSL modem itself. DSL filters are available for no charge at our offices.
If the problem persists, please call our 24 x 7 Technical Support Line at 1-800-884-0778 or contact one of our local business offices.
How do I check my HardyNet mail away from home?
You can log onto our website at www.hardynet.com from anywhere you have an Internet connection. You need your full username (including full email address) to access your HardyNet Gmail. To access your Gmail login, click on the Login dropdown menu in the top right corner of any page on our website. Then click on the HardyNet Gmail link that appears in the dropdown box. You also can go directly to login.hardynet.com to find your HardyNet Gmail login.
Can I have multiple log-ins?
Yes, HardyNet does allow two simultaneous logins, however the feature must be requested. Please contact us for details.
How many email addresses can I have with my HardyNet account?
You may have up to eight email accounts for free, others may be added if needed for a small monthly fee.
How do I change my HardyNet password?
You may change your password by contacting one of our local business offices.
How do I receive/send e-mail?
You can access your HardyNet Gmail by visiting login.hardynet.com and using your HardyNet e-mail address and password.
Many different e-mail clients exist, for assistance in creating an account using specific program, please contact Tech Support at 1-800-884-0778.
How do I troubleshoot Internet service problems on my own before calling Hardy?
Internet Service Problems
1. Verify that the Ubiquiti router (your router may vary) is powered on.
2. If the Ubiquiti router is powered on, power-cycle the router. Unplug the power cord from the router. Wait approximately 10 seconds and then reconnect the power.
3. If the problem is not resolved, please contact Hardy’s customer service department at (304) 897-9911 or (304) 530-5000 to report a trouble.
4. If you have multiple devices, determine if it is one device or all of your devices that do not work.
5. If it is just one device, power-cycle that device. Unplug the power cord or remove the battery from the wireless device that is experiencing connection issues. Wait approximately 10 seconds and then reconnect the power and reboot the device.
6. If it is multiple devices, power-cycle the router. Unplug the power cord from the router and wait approximately 10 seconds and then reconnect the power.
7. If the problem is not resolved, please contact Hardy’s customer service department at (304) 897-9911 or (304) 530-5000 to report a trouble.
When I receive a late notice, does this include Internet service?
No, a final notice does not include amounts due for your Internet service. Even after paying your final notice balance, your Internet could still be disconnected if it is also past due.
Do I receive a disconnect notice for my Internet account?
Your statement will be your only notification of a pending disconnect of your Internet service. If your statement has a past due amount, and your account is not received in our office by 4:30 p.m. on the due date, your service will be disconnected. Unless you notify HardyNet otherwise, the Internet service will be reconnected once you pay the account in full.
How can I pay my HardyNet or phone bill?
We have two business offices, one at 121 South Main Street in Moorefield and one at 2255 Kimseys Run Road in Lost River, where you can pay your bill by cash, check, money order or credit card (MasterCard or Visa only). Both of our offices are also equipped with a drop box in the parking lot for after-hours accessibility. For your convenience, Hardy accepts various other forms of payment including online or automatic MasterCard or Visa and/or bank drafts from any checking or savings account – for online payments, you must first be registered to use our Customer E-Care service, which is accessible on our homepage.
General
What is Hardy Telecommunications' donation policy?
Hardy Telecommunications will consider any donation request; however, we generally do not donate to individuals or national organizations, preferring instead to donate to local community groups or organizations.
How do I submit a donation request to Hardy Telecommunications?
All donation requests should be submitted in writing to Derek Barr, Assistant General Manager, 121 South Main St., Moorefield, WV 26836. Please include contact information and specify to whom a check – if approved – should be written and where that check should be sent.
How do I request advertising from Hardy Telecommunications?
If you would like to request that Hardy Telecommunications advertise with your event or in your publication, please submit that advertising request in writing to Derek Barr, Assistant General Manager, 121 South Main St., Moorefield, WV 26836. Please submit such requests at least two weeks before the advertising deadline for the event or publication.
How do I advertise in the Hardy Telecommunications directory?
Vivial publishes the Hardy Telecommunications directory. If you are interested in advertising in our directory, please call Vivial’s Maria Florentine at 1-888-779-1766 for details.